You’re asleep while your EV charges, and a wire that’s too thin starts heating up inside your walls.
I know, I know. You just want to plug in your new electric car and forget about it. But here’s the thing: wrong wire equals slow charging, tripped breakers, melted outlets, or worse—a house fire you never saw coming.
The frustration of contradictory online advice about wire gauge versus amperage is real. One forum says 8 AWG copper, another swears you need 6 AWG, and your neighbor’s cousin “just used his dryer circuit” and thinks you’re overthinking it.
I’ll walk you through every decision in plain English, no electrician jargon required. We’ll cover the NEC 125% continuous load rule, match your charger’s amperage to the right breaker, and figure out whether you need THHN wire in conduit or if Romex will actually work.
The relief you’ll feel knowing it’s done right? Worth every minute you spend here.
Keynote: What Type of Wire for EV Charger
The correct wire type for EV charger installation depends on three critical factors: charger amperage rating, circuit distance, and installation method. For Level 2 charging at 240V, use 8 AWG copper for 32A chargers on 40A circuits, 6 AWG copper for 40A chargers on 50A circuits, and 4 AWG copper for 48A+ chargers on 60A+ circuits, always applying the NEC 125% continuous load rule for proper breaker sizing and wire ampacity selection.
Wire Gauge 101: What Those Numbers Actually Mean for You
Decoding AWG Without the Headache
Think of wire gauge like a water hose—lower numbers mean thicker wire that carries more power safely.
6 AWG is thicker than 8 AWG; 8 AWG is thicker than 10 AWG. I know, backwards feels weird. But once you get it, everything else clicks into place.
Your charger’s amperage tells you exactly which gauge you need. A 32-amp charger? You’re looking at 8 AWG copper. A 40-amp setup? That’s 6 AWG territory.
The copper inside conducts electricity. The thicker it is, the less resistance it has, and the less heat it generates when power flows through it for hours.
Why EV Chargers Demand Special Treatment
Your charger runs for hours straight—electricians call this a “continuous load.”
That constant power flow creates heat, and heat is the enemy of safety. Your morning coffee maker only runs for 10 minutes. Your EV charger? It can run for 8 hours straight without stopping.
NEC code requires you to size everything at 125% of your charger’s rating. Yes, really. This isn’t electricians being paranoid. It’s physics.
Translation: A 40-amp charger needs a 50-amp circuit to stay cool and code-compliant. A 48-amp charger needs a full 60-amp circuit. This is the single most important rule in this entire guide.
Copper vs. Aluminum: The Material Choice That Determines Everything
Why Copper Wins This Race (Almost Every Time)
Copper handles continuous high loads without expanding and contracting like aluminum does.
Those tiny expansions over time? They create loose connections that spark fires. Slowly. Invisibly. Until something finally fails at 2 AM while you’re charging.
Most EV charger manufacturers only rate their terminals for copper wire anyway. Check your charger’s installation manual. You’ll see “copper conductors only” stamped right there.
The warm feeling of knowing you picked the safer option? Priceless.
“For continuous loads like EV charging, copper is the gold standard—aluminum’s expansion cycles create fire risks most homeowners never see coming.”
When Aluminum Makes Sense (And the Catches You’ll Face)
Long runs to detached garages can use aluminum feeder cable with proper transitions.
You’ll need a disconnect box where aluminum meets copper—no direct connections to your charger. The two metals have different expansion rates and create galvanic corrosion when they touch directly.
Aluminum saves roughly $2 per foot but requires anti-oxidant paste, special lugs, and exact torque specs. Miss any of those steps? You’ve created a future fire hazard.
On a typical 60-foot run, you save maybe $120 while adding complexity and risk. For most homeowners, copper’s simplicity wins.
The Quick-Match Guide: Your Charger’s Power Level to Wire Size
Level 1 Chargers (120V, Slow and Steady)
| Circuit Amperage | Breaker Size | Wire Gauge | Charging Speed |
|---|---|---|---|
| 12A | 15A | 14 AWG copper | 3-5 miles/hour |
| 16A | 20A | 12 AWG copper | 4-5 miles/hour |
Uses standard 12-14 AWG copper wire on existing 15-20 amp household circuits.
Adds 3-5 miles of range per hour—perfect for overnight top-ups if you drive under 40 miles daily. That’s your commute plus errands covered while you sleep.
No special wiring needed in most cases; plug into your garage outlet and go.
The frustration of slow charging versus the relief of zero installation cost? You decide.
Level 2 Chargers (240V, The Home Charging Sweet Spot)
| Charger Rating | Circuit Size (125% Rule) | Breaker | THHN/THWN-2 in Conduit | NM-B Romex Cable |
|---|---|---|---|---|
| 24A | 30A | 30A | 10 AWG copper | 10 AWG copper |
| 32A | 40A | 40A | 8 AWG copper | 8 AWG copper |
| 40A | 50A | 50A | 8 AWG copper | 6 AWG copper |
| 48A | 60A | 60A | 6 AWG copper | 4 AWG copper |
32A charger gets a 40A breaker and 8 AWG copper. This is the sweet spot for most households. Delivers about 7.6 kilowatts, adding 25-30 miles per hour.
40A charger gets a 50A breaker. Here’s where wire type matters. If you’re using THHN in conduit, 8 AWG works. Using Romex through your walls? You need 6 AWG because of NEC’s 60-degree temperature limit on cable assemblies.
48A charger gets a 60A breaker and 6 AWG copper minimum. Check your EVSE lug size limits. Many chargers can’t physically accept wire thicker than 6 AWG, which makes Romex a nightmare for this application.
Adds 25-30 miles per hour—the spark of convenience most EV owners crave. You park at 6 PM with 30% charge, wake up at 100%.
High-Power Setups (60+ Amps, For Speed Demons)
80-amp installations need 4 AWG copper or even 3 AWG on longer runs.
Your electrical panel probably needs upgrading to handle this continuous draw. Most homes built before 2000 have 100-150 amp service. Adding an 80-amp continuous load to that? The math doesn’t work.
Most homes don’t need this unless you’re driving 150+ miles daily and need ultra-fast top-ups. If you’re considering this, you’re probably also considering solar panels and a battery backup system. Talk to an electrician about a comprehensive electrical upgrade.
Distance Changes Everything: When Long Runs Demand Thicker Wire
The Voltage-Drop Trap You Can’t Ignore
Electricity loses power traveling through wire—like water pressure dropping in a long hose.
NEC recommends keeping voltage drop under 3% on branch circuits, 5% total system. That lost voltage means slower charging and wasted energy heating up the wire instead.
Every foot of wire has resistance. At 48 amps flowing through 100 feet of 6 AWG copper, you’re losing about 2.4% of your voltage. Still acceptable. Stretch that to 150 feet? You’re at 3.6%, and your car charges noticeably slower.
Your Distance Rule of Thumb
Under 50 feet: Stick with standard wire gauge from the tables above. You’re in the clear.
50-100 feet: Consider upsizing one gauge (8 AWG to 6 AWG) to maintain charging speed. The extra $100 in wire cost pays for itself in reduced energy waste over a few years.
Over 100 feet: Definitely upsize, maybe two gauges depending on your setup. This isn’t optional if you want full charging performance.
Example: 40A charger at 85 feet often bumps from 8 AWG to 6 AWG copper. The voltage drop calculation doesn’t lie, and neither will your slower-than-expected charging times if you ignore it.
Use an online voltage drop calculator—plug in your voltage (240V), amperage (your charger’s rating), one-way distance, and wire size. Keep that percentage under 3%.
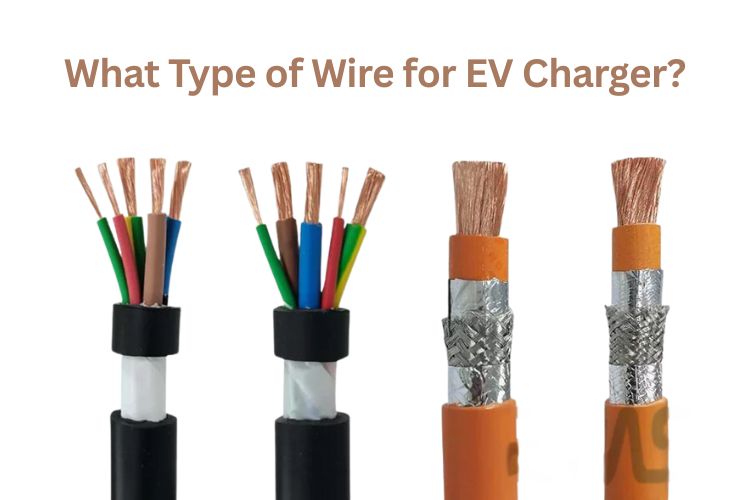
Cable Types and Installation Methods That Actually Work
NM-B (Romex) vs. THHN in Conduit vs. MC Cable
NM-B uses the 60-degree ampacity column—you’ll need thicker gauge than you think.
Here’s the trap: The individual wires inside Romex are rated for 90 degrees. But the plastic jacket around them traps heat, so NEC forces you to use the 60-degree ampacity ratings. That 8 AWG Romex you thought would handle 50 amps? It’s only rated for 40 amps as a cable assembly.
THHN/THWN-2 wire in conduit can use 75-90 degree ratings, letting you go smaller gauge. The conduit lets heat escape. That same 8 AWG copper as individual THHN conductors? It’s good for 50 amps.
MC cable with THHN conductors offers a practical middle ground for indoor runs. The metal armor protects the wire like conduit does, and you get to use the higher temperature ratings.
For outdoor or damp locations, conduit with THHN is your only safe bet. Romex isn’t rated for wet locations, period.
Hardwired vs. Plug-In: The Reliability vs. Flexibility Trade-Off
Hardwired connections eliminate the weakest failure point—the outlet-to-plug connection.
NEMA 14-50 outlets give you flexibility but can melt under continuous 40+ amp loads. I’ve seen the photos online. Charred plastic, melted prongs, burn marks on garage walls. These aren’t cheap residential outlets we’re talking about; even quality ones struggle with sustained high current.
If you’re installing 48 amps or higher, hardwiring isn’t optional—it’s required. Most building inspectors won’t even let you use a plug at that amperage for a continuous load.
Picture the confidence of knowing your connection can’t wiggle loose over time. No plug to work itself out. No outlet to overheat. Just solid copper terminations torqued to spec.
Do You Actually Need a Neutral Wire?
Most EVSEs run on 240V and only need two hot wires plus ground—no neutral required.
Running 8/2 or 6/2 with ground saves you money over 8/3 or 6/3 cable. On a 75-foot run, that’s $50-75 in your pocket.
Double-check your specific charger manual; some older models want that neutral. Tesla Wall Connectors? No neutral needed. Some older Clipper Creek units? They want one for their internal 120V electronics.
Safety Features You Can’t Skip (Even If You’re Tempted)
GFCI Protection and When It’s Already Built In
Many modern wall connectors include GFCI protection—don’t double up or it’ll nuisance-trip.
One GFCI in the system is enough. Two GFCIs protecting the same circuit? They fight each other, and you get random shutdowns mid-charge.
Outdoor installations absolutely need weatherproof boxes and GFCI. Moisture and electricity don’t play nice. A weatherproof box costs $30. A GFCI breaker runs $80-150.
Your electrician will know whether the breaker or the EVSE should provide this protection. Listen to them.
Breaker Sizing and Panel Capacity
Your breaker must trip before your wire overheats—that’s its whole job.
Label that breaker clearly: “EV Charger—Do Not Repurpose.” Future you, or the next homeowner, needs to know this isn’t a spare circuit for the hot tub.
Torque all connections to manufacturer specs; loose lugs create dangerous hot spots. Research shows that loose electrical connections cause up to 30% of electrical fires in homes.
A $25 torque wrench prevents a $250,000 house fire. Do the math.
The Costly Mistakes I’ve Seen (So You Don’t Repeat Them)
Borrowing Your Dryer Circuit “Just This Once”
Dryer circuits run intermittently; EV chargers run continuously for hours.
That 30-amp dryer outlet can’t safely handle a 32-amp continuous load—melted outlets prove it. Your dryer runs for maybe 45 minutes, cools down for hours, runs again. Your EV charger? Six hours straight at maximum output.
The most common fire-risk shortcut homeowners take, thinking it’ll save money. It saves maybe $800 in installation costs while risking everything you own.
Trusting Undersized Romex for High-Amp Installations
Real forum reports show 6 AWG Romex overheating above 60 degrees under continuous 48+ amp loads.
NM-B cable simply isn’t designed for this kind of punishment hour after hour. The outer jacket traps heat. The wire gets hot. The insulation breaks down over months or years. Then it fails.
The frustration of rewiring it all later? Worse than doing it right the first time. Plus you’ve been creating a fire hazard every single night you charged your car.
Skipping Permits and Professional Help
Unpermitted electrical work voids your homeowner’s insurance if a fire starts.
When you sell, buyers’ inspectors will ask why there’s no permit on record. That “saved” $200 permit fee just cost you $5,000 off your asking price. Or worse, killed the entire sale.
The sinking feeling of losing insurance coverage over a $200 permit? Not worth it.
Mismatching Breaker Size to Wire Gauge
Installing a 60-amp breaker with only 8 AWG wire creates fire risk—the breaker won’t trip in time.
The 125% rule exists for your safety, not to make your life harder. When that 8 AWG wire starts pulling 55 amps and overheating, your 60-amp breaker just sits there doing nothing because technically the wire hasn’t hit 60 amps yet.
Follow the tables exactly; there’s no room for “close enough” here.
What This Actually Costs (Because You Deserve to Know)
Material Costs Broken Down
| Material | Cost Per Foot | 100-Foot Run Cost |
|---|---|---|
| 6 AWG copper (THHN) | $3-4 | $300-400 |
| 8 AWG copper (THHN) | $2-3 | $200-300 |
| 6/2 NM-B Romex | $4-6 | $400-600 |
| EMT conduit (3/4″) | $1-2 | $100-200 |
| PVC conduit (3/4″) | $0.50-1 | $50-100 |
6 AWG copper runs $3-6 per foot depending on brand and where you buy. Big box stores charge more. Electrical supply houses give better pricing, especially if your electrician has an account.
Add $1-2 per foot for conduit if your installation requires it. EMT for indoor runs, PVC for underground or outdoor.
Breakers run $50-150; GFCI breakers cost more but may be required. A standard 50-amp breaker? Around $60. Need GFCI protection? $120-180 for the breaker.
Professional Installation: The Investment That Protects Everything
Licensed electricians charge $75-150 per hour in most markets.
Typical Level 2 installation runs $500-2,000 depending on distance and complexity. Simple attached garage with panel nearby? $600-900. Detached garage 80 feet away? $1,500-2,500.
That includes permits, inspections, and insurance coverage you can’t get with DIY. Your electrician’s insurance covers any issues. Your DIY work? That’s all on you.
Hidden Costs That Catch People Off Guard
Panel upgrades add $500-2,500 if your current service can’t support the load.
Trenching to detached garages runs $5-15 per foot of distance. Rocky soil? Tree roots? That $5 per foot becomes $15 real quick.
The relief of knowing it’s done once and done right? Worth every dollar. You’ll charge your EV thousands of times over the next decade. This investment pays for itself in safety and peace of mind.
Future-Proofing Without Going Overboard
Why Oversizing Wire Now Saves Hassle Later
Installing 6 AWG today instead of 8 AWG means easy charger upgrades tomorrow.
Next-generation EVs charge faster—you might want that speed in 3-5 years. Today’s 40-amp charger meets your needs. But when you trade in for a new EV in 2028 with an 11.5 kW onboard charger? You’ll wish you’d installed that 6 AWG.
Running conduit even if you don’t fill it yet? Smart move for easy wire swaps. An empty 1-inch conduit lets you pull new wire later without tearing apart walls. Costs maybe $150 extra now, saves $1,500 in retrofit work later.
Planning for a Second EV in Your Household
Two separate 40-amp circuits cost more than one shared 60-80 amp circuit with load management.
Smart load-sharing devices let multiple chargers play nice with your panel capacity. The system monitors your home’s total electrical draw and automatically adjusts charging rates to prevent overloads.
The confidence of knowing your electrical system can grow with your family? That’s planning ahead. When your spouse goes electric in 2027, you’re already set up.
Red Flags That Scream “Call a Pro Right Now”
You’re unsure what wire gauge or breaker size you currently have in that circuit.
Your home was built before 1990 without major electrical updates since. Aluminum wiring, outdated panels, no ground wires—these homes need expert evaluation.
You’re planning 50+ amps or a run longer than 60 feet from your panel. The complexity and safety stakes escalate fast at these levels.
Your breaker panel is already near capacity with AC, dryer, and other heavy loads. Adding a 50-amp continuous load might push you over the edge.
You’ve never worked with 240V circuits or opened your breaker panel before. 240V can kill you. No judgment here—just reality.
Your local code or HOA requires licensed electrician signoff on EV installations. Many jurisdictions do, and for good reason.
“This is continuous load work—one mistake creates fire risk that builds slowly over months until something finally fails.”
Your Final Checklist Before You Buy Wire
I confirmed my charger’s exact amp rating from the manual or spec sheet.
I measured the distance from my panel to charger location (add 10% for routing). Don’t measure in a straight line through walls—measure the actual path wire will take.
I verified my home’s electrical service can support this additional continuous load. Call an electrician for a load calculation if you’re unsure.
I understand copper is safer than aluminum for this application. Unless you’re running 150+ feet to a detached structure, stick with copper.
I know my local permit requirements and inspection process. One phone call to your building department answers this question.
I have quotes from at least two licensed electricians with EV experience. Not just “any” electrician—find one who’s done EVSE installs before.
I considered future needs like faster charging or adding another EV. That extra $200 in materials now beats a $1,500 retrofit later.
I budgeted for quality materials and professional labor, not just the cheapest option. Your house and family deserve better than bargain-basement electrical work.
I have realistic expectations: this isn’t a DIY job unless I’m a qualified electrician. Even experienced DIYers should think twice about 240V work.
I recognize this continuous load demands special safety considerations beyond typical circuits. This isn’t like wiring a ceiling fan.
Conclusion: Charge with Confidence, Sleep Easy
You now know more about EV charger wiring than 90% of new EV owners. The right wire—usually 6 or 8 AWG copper on a properly sized breaker using the NEC 125% continuous load rule—makes all the difference between safe charging and costly problems.
You understand that THHN in conduit gives you better ampacity ratings than Romex, that distance requires upsizing to prevent voltage drop, and that hardwired installations beat plug-in connections for reliability at high amperages. Quality materials and professional installation protect your home, your car, and everyone you love. That spark of relief when your electrician says “inspection passed”? You’re about to feel it.
Your Next Move: Call two licensed electricians this week. Ask them about their EVSE installation experience, request load calculations, and get detailed quotes that specify wire gauge, breaker size, and whether they’re using conduit or cable. Make the call today.
Type of Wire for EV Charger (FAQs)
What gauge wire do I need for a 50 amp EV charger?
No, a 50-amp breaker doesn’t power a 50-amp charger. Use 8 AWG THHN copper (in conduit) or 6 AWG NM-B Romex for a 50A circuit. This setup safely powers a 40-amp continuous load charger per the NEC 125% rule.
Can I use 8 AWG wire for a 40 amp charger?
Not directly—you need a 50A circuit. 8 AWG THHN in conduit works for 50A circuits (powering 40A chargers). But 8 AWG Romex is only rated 40A at 60 degrees, which isn’t enough for the required 50A circuit.
Is THHN better than Romex for EV charging?
Yes, for high-amperage installations, THHN wins. Individual THHN conductors in conduit use 75-90 degree temperature ratings, allowing smaller wire gauges than Romex. Plus better heat dissipation for continuous loads and outdoor-rated options for wet locations.
How far can I run wire for an EV charger?
Keep voltage drop under 3% for best performance. For 40A at 240V: 6 AWG copper safely runs 125 feet, 8 AWG handles 75 feet. Beyond these distances, upsize one gauge to maintain full charging speed and efficiency.
Do I need a permit for EV charger wiring?
Yes, virtually all jurisdictions require permits for 240V circuit additions. Permits ensure code compliance, enable inspections, maintain insurance coverage, and preserve home value. Costs typically run $100-300 and protect you from much larger future problems.